
White Hat and Black Hat SEO:
How AI Search Is Raising the Stakes
AI search is changing how search optimization works. See how white hat and black hat SEO tactics are evolving and…
Read More

DISCLAIMER: This article assumes you already have Google Analytics set up for your website. It is also intended for basic uses of event tracking for the everyday person. If you need additional help with advanced Google Analytics tracking implementation, send us a message and we can work with you directly.
The purpose of this event tracking “how-to” is to simplify the process and make event tracking easy and painless for anyone. Yes, anyone… even if you think the word “code” has something to do with a super-secret encryption message used in the movie National Treasurer. Anyways, this guide will explain Google Analytics event tracking in good ole’ fashioned plain English.
If you already have the basics down, skip to the next section.
For those starting from square one, here are some simple explanations of event tracking and why you should be using it.
I could write a few paragraphs explaining all the information in the Google Developer’s Guide, but this is event tracking made simple… so I will skip all the technical jargon. You can review Google’s guide here if you want to learn more.
Here is a quick reference guide for the elements of HTML code that we will be defining in the next step (bear with me, it’s actually not as bad as it seems).
Universal Analytics (analytics.js)
ga(‘send’, ‘event’, ‘category’, ‘action’, ‘label’, value);
Now that you understand the basics of what event tracking is and why you should be using it… here is where I want to make this easy for you.
What if I told you that there is a more flexible way to implement tracking on your website, that doesn’t involve hard coding every page but follows the same anatomy structure of event tracking that you just read about? To be clear, Google Tag Manager is not a replacement for Google Analytics. Google Tag Manager is simply, as the name suggests, a “tag manager”. It has no reporting capabilities because that is still handled by Google Analytics. Think of tag management as the middle man. Google Tag Manager is a tag management system that includes the same functionality as global site tags and lets you configure and instantly deploy tags on your website or mobile app from an easy-to-use web-based user interface.
Let’s start off with an example of how to set up tracking for a “Contact Us” button on your homepage. You want to track and see how many people are clicking this button.
The trigger tells the tag to fire when the specified event is detected. Every tag must have at least one trigger in order to fire. Let’s name the trigger “Button – Contact Us”.
Since we are tracking clicks, we want to use Click – All Elements.
This indicates when the trigger will fire and sends a signal to Google Analytics that an event is occurring. We are selecting “Some Clicks” because we only want to focus on the contact us button. If we did all clicks, it would track every click on the page.
This is telling the trigger exactly when to fire and send the signal. Let’s set this up as “Click Text – equals – Contact Us”. This will fire this trigger when the text on the button is equal to Contact Us. This ensures that it will not trigger any other button on your page, because it has to specifically say “Contact Us”.
Now, save the trigger.
![]()
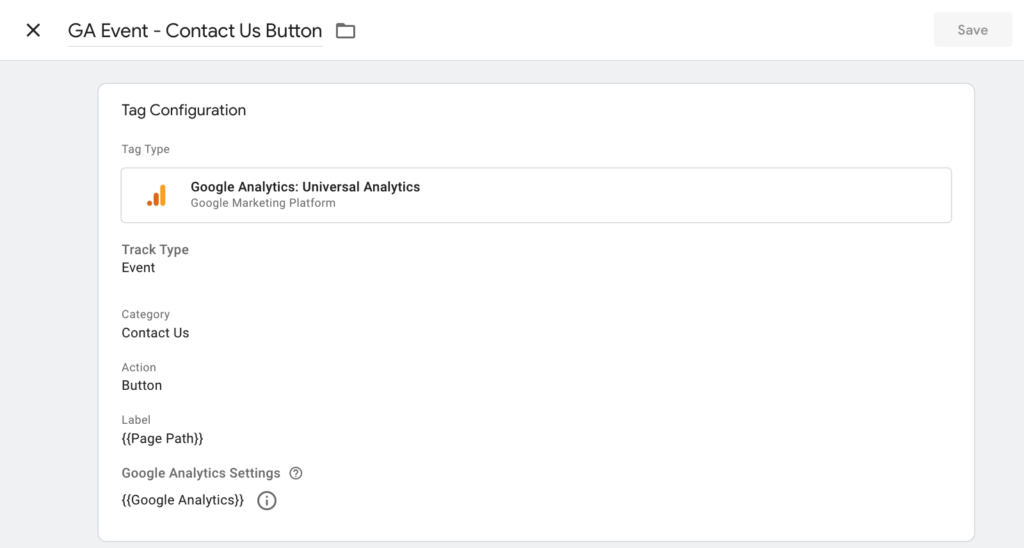
Now that we have that setup, we must create the tag that corresponds to the trigger. The tag’s job is to send the information to Google Analytics on what event was triggered. Let’s name the tag “GA Event – Contact Us Button”.
Google Analytics: Universal Analytics. (This corresponds to the platform it’s sending information to.) The Track Type will be Event.
The next steps will be similar to the anatomy of event tracking that you previously read.
Once all of that is set up, you will connect the corresponding trigger we just created in the previous step to your tag. If you forget to do it, the tag manager will remind you because every tag needs to be connected to a trigger. Save your tag.
Once you’ve tested your tags and triggers in preview mode and published it in your Google Tag Manager account, you’re all set to set up conversion tracking in Google Analytics! Keep your goals organized by grouping similar events in Google Tag Manager into the same category. Since Google Analytics (UA) limits you to 20 goals per view, instead of creating a separate goal for every contact form event you have on your site, put them all into the same category of “contact”. The events will come through individually in your Google Analytics data because of how you set up each event in GTM, but your goals will be structured in a much more organized way.
And there you have it! That’s how you can easily set up event tracking using Google Tag Manager. Did I forget to mention that GTM is free to use? There are no monthly or yearly fees! Hopefully, you’ve learned something today that you can go forth, improve your website, and increase your goal conversions. Happy tracking!